
Let me start by saying that I did not invent the wonky star
block. It has been around for a long time and you may have made one in
the past. This tutorial is not original – I read quite a few before
I made my block and was influenced by others methods. I do need to give a
shout out to Jane at Jane's Fabrics blog as she demonstrated one part
of the method that I liked and used. I’ll let you know when we get
there.
I also have to say that my block idea is not original. I
took a look at the link that Lisa provided to Stash Bee’s post on fun blocks to use and I really liked
the look of one by Jolene from Blue Elephant
Stitches blog. I don’t have her permission to copy the photo of
the quilt but you can see it here.
So I would like you to make me a 12.5 inch (12 inch finished)
Wonky Star block. I would like you to use colour. I love
colour. Please don’t use solids or tone on tone fabrics. Please
don’t use anything that is predominantly black, white or brown, although it is
fine to have these colours in a fabrics that is predominantly some other
colours.
Here is my pile of fabric as I played around figuring out what I
was going to use.

In the end I decided on these two…

The one on the top is Silent
Cinema by Jenean Morrison from Westminster fabrics. I loved
this line when it came out and bought a few different colour ways of the
different fabrics, but I haven’t used it much. The one on the bottom from Art Gallery Fabrics Sugar Collection and is called Feel the Difference.
It is my favourite fabric right now and I am always wanting to use it.
Good thing I bought a few meters of it.
Enough rambling. Here’s how to make the Wonky Star
block. Cut eight 4.5 inch blocks from whichever fabric you are going to
use for the background and five 4.5 inch blocks from whichever fabric you are
using for the star.

Cut four of the star fabric blocks in half diagonally –
only four, leave the fifth one intact.

Place four of the background blocks out right side up and place
four of the star triangles right side down on the blocks like so…

You notice that they are all different? This is what will
make the star wonky.
When you are laying your triangles out flip them over to see how
they will look once sewn to make sure you like how they look.
 One
of my blocks was problematic because when I flipped it over it looked
like this… Do you see how far to the left the yellow fabric is on the bottom. This did not make for an attractive point on the star.
One
of my blocks was problematic because when I flipped it over it looked
like this… Do you see how far to the left the yellow fabric is on the bottom. This did not make for an attractive point on the star.
 Another one was a problem because when the yellow
was flipped over it did not completely cover the 4.5 inch block.
Another one was a problem because when the yellow
was flipped over it did not completely cover the 4.5 inch block.
Sew across the long edge of the triangles using a 1/4 inch
seam. Press the star fabric open.

Now place your second set of four triangles face down on the four
blocks like so… flip the triangles over so that you will see what
they look like once sewn again. This will prevent having to do any
reverse sewing.

Sew again along the long sides of the triangles using a 1/4 inch
seam and press open.

Now this is the part that I got from Jane.
You notice that we didn’t trim any of the background fabric before adding the
second triangle. Now you can flip the blocks over – wrong side
up – and use the original block as a guide to trim back the star points.

Trim all four star point squares to 4.5 inches then use
your small scissors to cut away the excess background fabric. I don’t
know if this is really easier and if you are an accomplished wonky star maker
and want to do it the other way, well please do.

Lay out your nine squares thusly, putting the squares with the
star points in a pleasing arrangement.
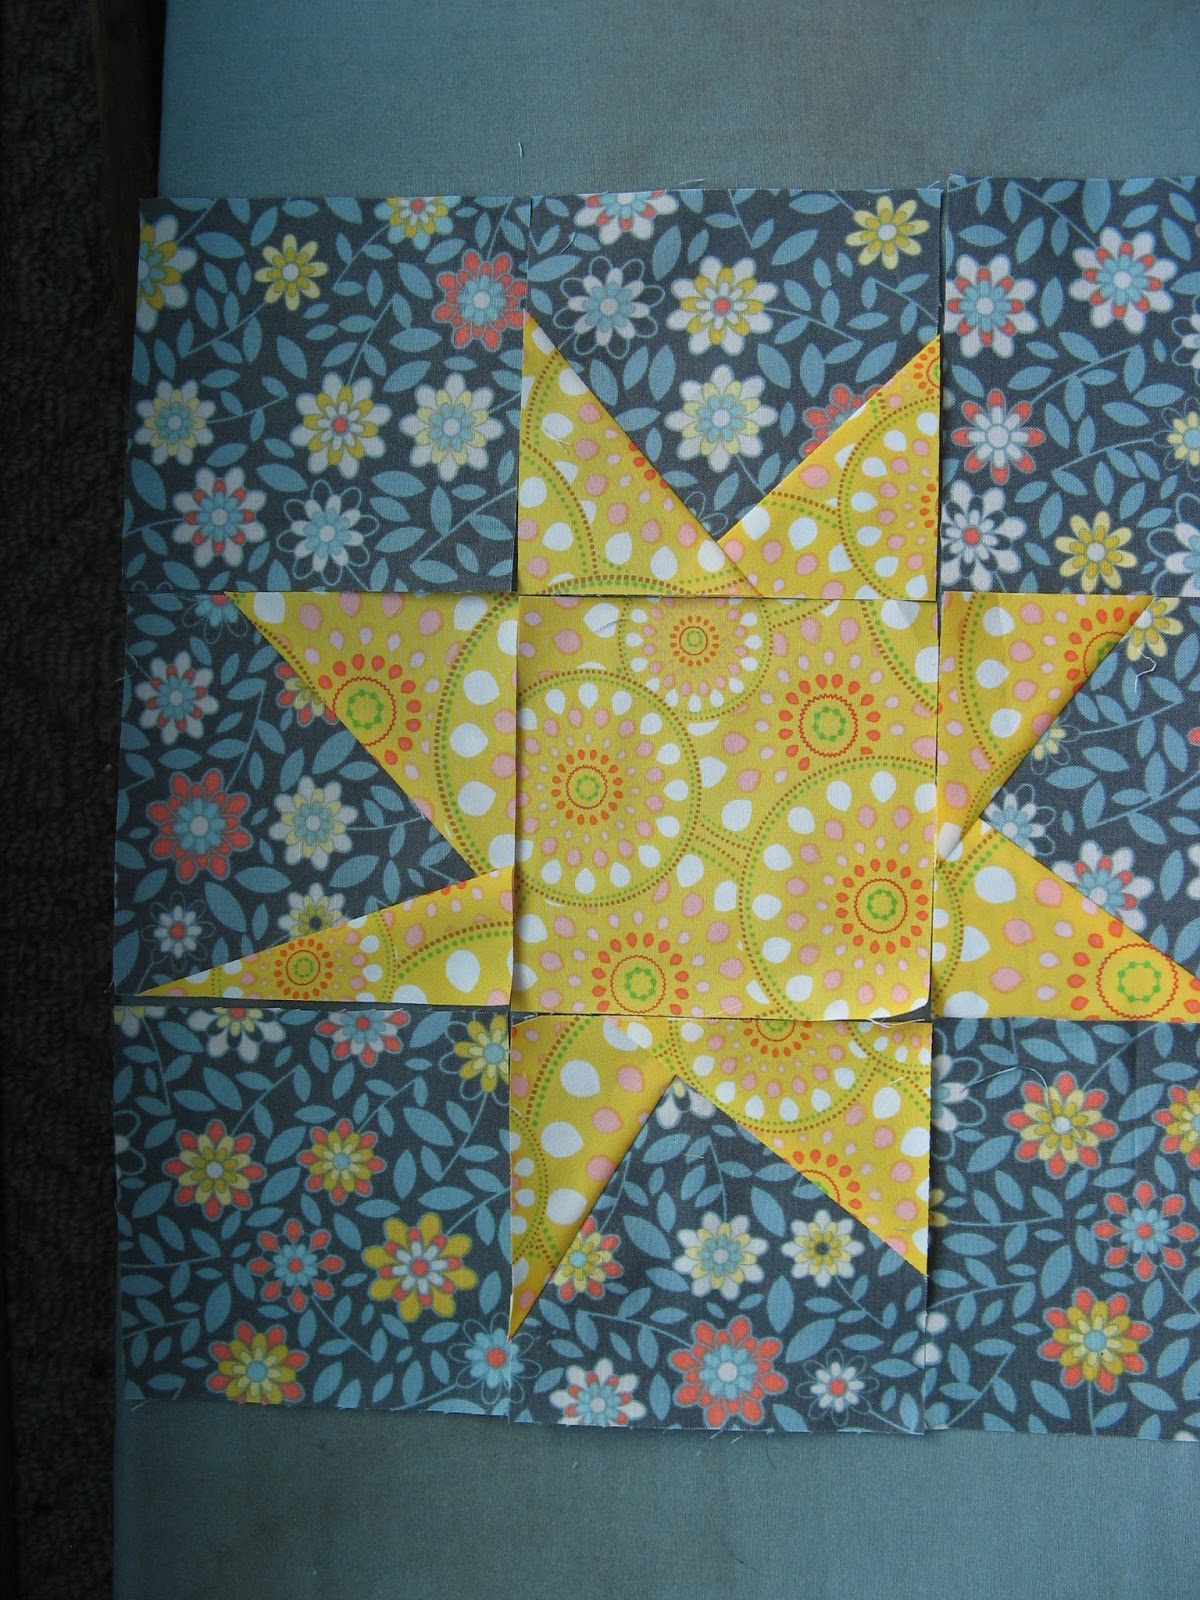
Sew the rows together, using a 1/4 inch seam.

Press the two outside row seams out to the side blocks and press the
middle row toward the middle block. This will allow the seams to nest
when sewing the rows together which is the last step. Eh voila!!

A wonky star block! I can’t wait to see what wonderful
colours my peeps in the Canadian Quilt bee come up with.
Janet
Hello Janet - long time no hear so it is good to hear from you. Nice tutorial. Do we get to see all your finished stars? Hope you had a good summer. xx
ReplyDeleteGreat little tutorial! I love the look of wonky stars but I have so much trouble cutting away the excess fabric!
ReplyDeleteI haven't made a wonky quilt yet, and that's something I want to do some day. Thanks for putting up a tutorial for it. :)
ReplyDeleteWhat a great wonky star. Thanks for the tutorial.
ReplyDelete